Runoff curve numbers (also referred to as curve numbers or simply CN) are empirical parameters that are commonly used in hydrology for estimating runoff volumes from rainfall excess. The curve number method was developed by the USDA Natural Resources Conservation Service (formerly the Soil Conservation Service or SCS).
Weighted curve numbers are calculated for each watershed based on consideration of land use and hydrologic soil groupings. The CatchmentSIM Curve Number Calculator automatically calculates weighted curve numbers for each watershed using land use and soil type GIS layers in conjunction with lookup tables.
In order to use the Curve Number Calculator, land use and soil GIS layers must first be added to the CatchmentSIM project. The soils and land use GIS layers can be added to the project by clicking the "Add" button in the vector layer section of the View Attributes form.
To open the Curve Number Calculator, select Utilities >> Curve Number Calculator. The Curve Number Calculator comprises four tabbed pages that are used in a sequential manner. A description of each page is provided below.
Soils

Click to Enlarge Image
The "Soils" page is used to assign hydrologic groups based on the soil GIS layer and optionally soil names (for reporting purposes). If the hydrologic soil groups and/or soil names are contained within a GIS field, then the "Use Soil GIS Attribute" radio buttons should be selected. The soil GIS file should then be selected from the 'GIS File' drop down box and the hydrologic groups and soils names should be selected using the 'Hydrologic Group Field' drop down box and 'Soil Name Field' drop down box respectively.
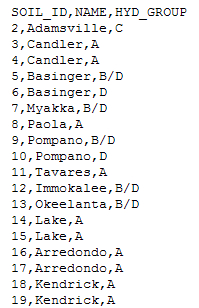
However, if this information is not contained in the GIS file, then a soil lookup table must be used to assign soil names and hydrologic groupings. The soil lookup table is a CSV file that will typically contain a soil ID number in the first column (this will need to match a corresponding Soil ID number in the GIS file), the soil name and the soil hydrologic group. An example of an extract from a soil lookup table is provided below.
To use the GIS soil layer and lookup table to assign hydrologic groups and soil names, ensure that the "Use Soil ID and Lookup Table" radio buttons are selected. Select the soils GIS layer from the left and right "GIS File" drop down boxes and select the GIS field that contains the soil ID numbers from the "Soil ID Field" drop down boxes.
The lookup table that contains the soil ID, soil name and hydrologic groupings must be specified by clicking the "Open Lookup Table" buttons. Separate lookup tables must be opened for both Hydrologic Groups and Soil Names. This enables you to have separate lookup tables for hydrologic groups and soil names if desired. However, if the Hydrologic Groups and Soil Names information is contained within the one file, the same lookup table can be opened twice. The lookup table column containing the soil ID numbers must be selected from the 'Lookup ID Column' drop down boxes. The lookup table column containing the soil hydrologic groups is selected using 'Lookup Hyd Column' drop down box and lookup table column containing the soil names should be selected from the 'Lookup Name Column' drop down box.
Land Use
The "Land Use" page is used assign detailed land use descriptions to the land use GIS file. The "Land Use" page is also used to assign runoff curve numbers to each land use description for the four different hydrologic groups (ie., A, B, C and D).
The land use GIS file should be selected from the 'GIS File' drop down box. The GIS field containing the basic land use description is selected from the 'Land Use Attribute' drop down box. Once this is selected, all of the available land use descriptions will appear in a new column in the centre of the "Land Use" page. These basic land use descriptions must be assigned a more detailed land use description as well as the associated curve numbers. This is achieved using a land use / curve number lookup table. The land use / curve number lookup table is typically extracted directly from publications such as TR-55 and comprises a CSV file that contains a detailed land use description in the first column and curve numbers for hydrologic soil groups A, B, C and D in the second, third, fourth and fifth columns. An extract from a typical land use / curve number lookup table is provided below.

To open the land use / curve number lookup table, click the "Load Land Use / CN Table" button. Select the lookup table column that contains the detailed land use descriptions from the 'Land Use Column' drop down box. Once you select this field, a second column will appear in the table in the centre of the "Land Use" page. If you click any table cell in this new column, a drop down box should appear as shown below.

Click to Enlarge Image
All of the detailed land use descriptions from the lookup table will be available in this drop down box. Scroll through the available detailed land use descriptions and select the one that most closely matches the associated land use descriptions in the first column. Repeat this procedure for all of the land use descriptions.
If you would like to save the new lookup table that you have created in the centre of the page to use at a later date or for quality review purposes, you can click the "Save Lookup Table" button.
Dual Hydrologic Groups
The "Dual Hydrologic Groups" page is used to determine how an individual hydrologic group will be assigned for soils with dual hydrologic groupings (i.e., A/D, B/D and C/D). For soils with dual hydrologic groupings, the first letter applies where soils can be freely drained, while the second letter applies to undrained soils.

Click to Enlarge Image
Four different options are available for calculating which hydrologic group letter to adopt:
1.Use First Group - This option will globally adopt the first hydrologic group letter. This may be suitable in a completely urban environment where drainage infrastructure would allow all soils to freely drain.
2.Use Second Group - This option will globally adopt the second hydrologic group letter (i.e., D). This may be suitable in a completely undeveloped environment where soils may not be able to freely drain.
3.Use First Group for the Following Land Uses - This option allows you to assign the first hydrologic group letter based on the overlaying land use by selecting a land use description from the drop down box (as defined on the "Land Uses" page) and clicking the "Add" button. Any land uses not added will be automatically assigned to the second hydrologic group letter.
4.Use Second Group for the Following Land Uses - This option allows you to assign the second hydrologic group letter based on the overlaying land use by selecting a land use description from the drop down box (as defined on the "Land Uses" page) and clicking the "Add" button. These will typically be undeveloped land uses (e.g., woods). Any land uses not added will be automatically assigned to the first hydrologic group letter.
Basin Select
The "Basin Select" page allows you to specify if you would like to calculate runoff curve numbers for watershed boundaries that were derived in CatchmentSIM or whether you would like to import the watershed boundaries from an external GIS file.

Click to Enlarge Image
To use watershed boundaries that have been delineated in CatchmentSIM, ensure that the "Use basin boundaries in current CatchmentSIM Project" radio button is selected. If you would like to import the watershed boundaries from an extrtnal GIS file, ensure that the "Import basin boundaries from external GIS file" radio button is selected. Next the GIS field that contains the watershed ID must be selected. This can be specified directly by selecting the "Use Basin GIS Attribute" radio and selecting the watershed GIS file and GIS file attribute containing the watershed ID using the 'GIS File' and 'Basin ID Field' drop down boxes respectively.
Once the watershed boundary data source and watershed ID's are specified, the curve number calculation can be completed by clicking the "Run CN Calculator" button. CatchmentSIM will create all of the necessary soil, land use and curve number raster files and add them to the CatchmentSIM project. This can be a time consuming process as the program needs to rasterise the existing soils and land use layers and create six new raster layers. By default, CatchmentSIM will create the following raster files:
•Basin ID: raster grid file containing basin/watershed ID.
•Soil_Names: optional raster grid file containing soil name information.
•Hyd_Group_Raw: raster grid file containing raw hydrologic soil group information. Dual hydrologic groupings are preserved.
•Landuse_Raw: raster grid file containing raw land use description as read directly from land use use GIS file.
•Landuse_Refined: raster grid file containing detailed land use descriptions extracted from land use / CN lookup table.
•Hyd_Group: raster grid file containing final hydrologic groupings used for curve number calculations. For soils with dual hydrologic groupings, a single hydrologic group will be defined based on criteria specified on the "Dual Hydrologic Groups" page.
•Curve_Numbers: raster grid file containing curve numbers.
Before CatchmentSIM begins to rasterise the soil and land use GIS files, a Vector Data Set Operations form will appear. This form allows you to specify which GIS entities in the soils and land use GIS files you would like to rasterize. We are interested in rasterizing all pixels that lie on a land use or soils polygon boundary as well as all pixels that are within a land use or soils polygon boundary. When the Vector Data Set Operations form appears, make sure the "Pixels on Polygon Boundary" and "Pixels within Polygon" check boxes are selected (as shown below) and click "OK".

Click to Enlarge Image
Results
Once CatchmentSIM has completed all of the necessary raster calculations, the curve numbers for each watershed can be reviewed on the "Results" page and exported a CSV file.
On the "Results" page, you must first select which of the newly created raster layers you would like to select for reporting purposes. Select the desired raster layers by placing a tick in the check box adjacent to each raster layer name.

Click to Enlarge Image
Click "Select". CatchmentSIM will intersect each of the selected layers and will list each unique land use and soil combination along with it's associated area and curve number in the main window as shown below.

Click to Enlarge Image
By default all watersheds will be displayed in the main table. If you would like to review the curve number for a specific watershed, click on "All" in the 'Filter By' column next to Basin ID in the table located in the top right corner of the "Results" page. This will open a drop down box listing all of the watersheds in the project. Select a watershed (say 22) and click 'Refresh'. The main table will be updated and will only show the curve number calculations for basin 22, as shown below.

Click to Enlarge Image
The curve number calculations can be saved to a CSV file for reporting purposes. The curve number calculations can be grouped in a variety of ways. However, the most common method is grouping by the watershed (or basin) ID. Select "Basin ID" from the drop down box near the base of the form and then click the "Save to CSV (group according to selected category)" button. The resulting CSV file will look similar to the following when opened in Excel:

Click to Enlarge Image