The 'Interpolate Grid From Points' form can be used to create a complete raster grid layer from any supported file containing scattered point information. Currently supported file formats include:
•Mapinfo *.mid/mif
•ESRI *.shp
•12d *.12da
•Comma Separated Values *.csv
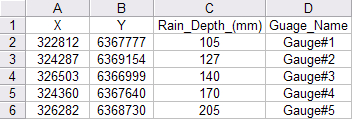
In order to use a *.csv file, the first two columns in the CSV file must contain the X and Y coordinates of the point. Any additional information can be placed in the remaining columns. In addition, the first row should contain a 'Header' or description of the contents of each row. For example, the following CSV file is suitably formatted:
When the 'Interpolate Grid From Points' menu option is selected, an 'Open' dialog box will appear, as shown below. The scattered point file that is to be used as the basis for the interpolation should be selected. Please note that the point file cannot be open in any other applications when you select it from the 'Open' dialog otherwise an I/O error will occur.

Click to Enlarge Image
Once the point file is selected, the 'Interpolate Grid From Points' form will appear, as shown below.

Click to Enlarge Image
Five different algorithms are available to interpolate data from the available point values, as indicated by the three tabs located in the 'Interpolation Algorithm' section of the form. The tab that is selected when you press the  button will be the algorithm that is adopted for the interpolation. The available interpolation algorithms are:
1. Inverse distance to a power;
2. Moving average; and,
3. Nearest neighbor (Thiessen Polygon).
4. Natural Neighbour
5. Kriging (Ordinary)
Irrespective of which interpolation algorithm is employed, the more points that are available, the more reliable the interpolation will be. Each interpolation algorithm can generate distinctly different outcomes. Therefore, it is important to understand how each algorithm functions in order to use the most appropriate algorithm for a particular application. Further information on each interpolation algorithm is provided below.
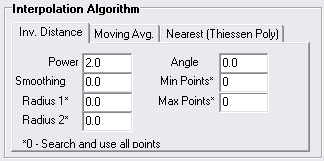
The 'Inverse Distance to a Power' algorithm is a weighted average interpolator. It functions in a similar way to the Interpolate DEM function and is the recommended approach in the majority of circumstances.
The 'Radius' and 'Angle' parameters are related to the size and orientation of the search ellipse that is created around each grid point. The minimum and maximum number of points within each search ellipse can also be specified when undertaking the interpolation (setting the Min and Max Points values to zero will allow all points in the search ellipse to be considered). The 'Smoothing' parameter will smooth grid values in areas with large changes in adjacent grid cell values, however, this has been found to have negligible impacts on the results generated by the algorithm and the default value of 0 is recommended.
For every raster grid cell the resulting grid cell value,  , will be calculated using the following formula:

Where:
• is a known point value;
• is the distance from the grid cell to the point value;
• is a weighting power (the default power value of 2 will generally produce acceptable results. This produces a weighting factor that is proportional to the square of the distance between the grid point and the known point value).
To ensure that all available points are included in the interpolation algorithm, set each radius value to 0.
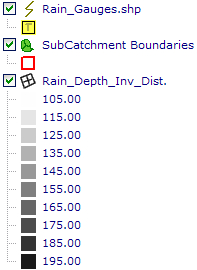
An example of the output from the 'Inverse Distance to a Power' algorithm is shown below, based on the above CSV file containing 5 rainfall depth point values. The rainfall gauge locations are also shown.

Click to Enlarge Image
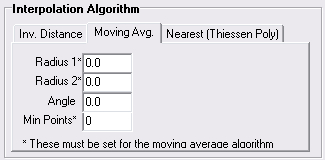
The 'Moving Average' algorithm is a simple data averaging algorithm. It uses a moving elliptical window to search values and averages all data points within the search window. The center of the search ellipse is located at each grid cell which is to be populated. The minimum number of data points to average can also be set and if there are insufficient points in the search window the grid cell is considered empty and will not be assigned a value.
Mathematically, the 'Moving Average' can be expressed with the following formula:

Where:
• is the resulting value at the grid cell;
• is a known point value; and,
• is the number of known points in the search ellipse.
Be aware that, unlike the other two interpolation algorithms, if you set the 'Radius' values to 0, all values will be considered in the 'Moving Average' algorithm resulting in a grid with a uniform value throughout (being the average value of all the available points). Therefore, it is recommended that you experiment with a number of different radius values until an acceptable outcome is achieved.
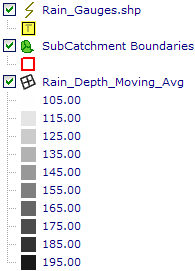
An example of the output from the 'Moving Average' algorithm is shown below, based on the above CSV file containing 5 rainfall depth point values. Both radius values were set to 1600 for this example so that only a select number of points are considered in each search ellipse. The rainfall gauge locations are also shown.

Click to Enlarge Image
Nearest Neighbor (Thiessen Polygon)
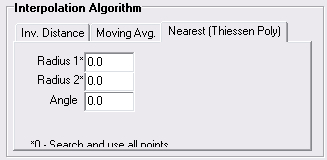
The 'Nearest Neighbor' algorithm doesn't perform any interpolation or smoothing, it just takes the value of the nearest point found in the search ellipse and returns it as the result. If there are no points found within the search ellipse, no value will be assigned. This is analogous to the 'thiessen polygon' concept which defines polygons such that the area within the polygon is closest to a populated point relative to all other points (this assumes that the 'Radius 1' and 'Radius 2' values are set to 0 so that all data points are considered).
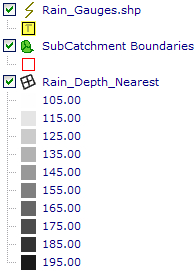
An example of the output from the 'Nearest Neighbor' algorithm is shown below, based on the above CSV file containing 5 rainfall depth point values. A radius value of 0 was set so that all point values are considered in the algorithm. The rainfall gauge locations are also shown.

Click to Enlarge Image
Each of the interpolation algorithms employs a search area specified in the form of rotated ellipse. It is described by three parameters:
• is the first radius (east-west axis if rotation angle is 0)
• is the second radius and is always at 90 degrees to (north-south axis if rotation angle is 0)
• is the search ellipse rotation angle (measured clockwise in degrees)
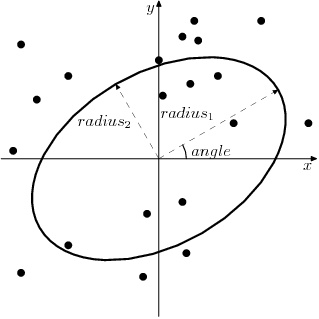
Therefore, to set a circular search area ensure that and are set to equal values. To ensure that all available points are included in the search algorithm, set both radius values to 0.
Natural Neighbor interpolation is an advanced interpolation method developed by Robin Sibson.More information can be found at the following links:
• http://en.wikipedia.org/wiki/Natural_neighbor
•http://dilbert.engr.ucdavis.edu/~suku/nem/nem_intro/node3.html
There are no parameters required for natural neighbor interpolation, simply select this tab on the form and click Create.
Ordinary Kriging is an advanced form of spatial interpolation that used Gaussian processes to optimise smoothness of the interpolated values. More information can be found at the following links:
•http://en.wikipedia.org/wiki/Kriging
•http://en.wikipedia.org/wiki/Kriging#Ordinary_kriging
You have the option of specifying the Nugget, Range and Sill but by default, CatchmentSIM will estimate them for you. As such, simply select this tab on the form and click Create.