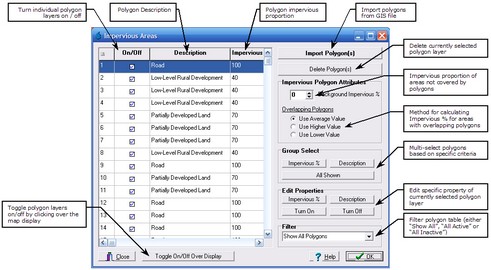
The Impervious Areas form allows the user to import and manage impervious area polygon databases from GIS files. These polygons are used to derive impervious area proportion statistics for the mapped subcatchments.
Importing Impervious Area Polygons
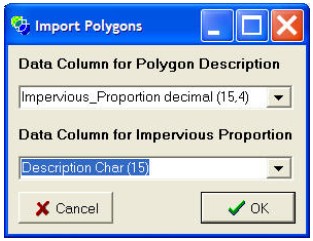
The Import Polygon(s) button will prompt the user to select a GIS file that holds the impervious area polygons. The impervious areas must be in the form of polygons and can contain advanced polygon structures such as multi-region polygons. Once a file has been selected, the user will be prompted to select the columns in the GIS data file that correspond to the Description and Impervious Area properties in order to populate the fields in the table.

If the GIS file does contain appropriate data columns these should be selected in the corresponding drop down box. The Polygon Description data columns should be a text columns whereas the impervious proportion data column should be a decimal or integer column. If the GIS file does not contain such data columns, the user should select 'None' for each drop down box. In this case, all polygons will be imported with a blank description and 100% impervious proportion. This can later be altered using the tools described below.
Manipulating Impervious Area Polygons
The table shown in the Impervious Area form doesn't indicate the location of each individual impervious area polygon which can make manipulation of the database difficult. To overcome this, two features have been implemented. Firstly, when an impervious area polygon is selected in the table the actual polygon will be highlighted in red in the background. Secondly, the user can turn the polygons on/off visually by clicking the Toggle On/Off Over Display button. This option will cause the form to disappear and the impervious area polygons will be displayed in black and grey. The black polygons are 'on' while the grey polygons are 'off'. Clicking on a polygon will toggle its on/off status and hence its colour. When editing is complete, clicking Finished will return to the Impervious Areas form with updated on/off criteria.
You may wish to group select polygons and apply changes to all of the selected polygons. This can be done by using the Ctrl and Shift buttons, or group selecting based on matching impervious proportion or description criteria. For example, to select all polygons with the description 'Road' click the Description button in the Group Select group box. You will be prompted to supply the group select description criteria in a text box. After clicking OK all polygons with 'Road' as the description should be selected. Similarly, polygons can be selected on the basis of their impervious proportion or all polygons currently displayed (use the Filter to manipulate which polygons are displayed.
After a group selection has been made, all selected polygons may be manipulated using the buttons in the Edit Properties group box.
The Filter governs which polygons are listed in the table. This can be useful to make multi-selecting easier if using the All Shown button or Ctrl and Shift buttons.
Deleting Impervious Area Polygons
Impervious area polygons can be deleted by individual or group selection and then clicking the Delete Polygon(s) button. Deleting polygons should only be used when polygons are to be permanently deleted, otherwise turning them off may be preferred.
Calculation of Subcatchment Impervious Areas
The impervious areas of each subcatchment are calculated as a result of the impervious area polygons, the overlapping polygon criteria and the background impervious proportion. The individual impervious proportions for each polygon are listed in the table and may be manipulated as described above. The overlapping polygon criteria is shown on the form and governs what impervious proportion will be applied to DEM pixels that are within multiple polygons with differing impervious area proportions (use max, min or average). The background impervious proportion is applied to all DEM pixels that are not within an impervious area polygon. The methodology for determining if pixels are within polygons is outlined in the Algorithms Section.
