BASINS is freely available software developed by the U.S. EPA. It is used to perform watershed and water quality investigations using point and non-point source data. Further information on the software can be found here.
BASINS incorporates an automated data download facility to setup new projects. To use this facility, the user specifies a geographic area and BASINS will automatically download selected data (e.g., DEM, land use and soil maps plus others) from EPA, USGS and other internet locations. After downloading the data, BASINS will automatically extract the data, re-project the data (if necessary) and combine the data into a BASIN project file. Additional data can also be downloaded using the Web Data Download tool for the geographic area of interest.
Version 4 of BASINS was developed using an open source GIS software architecture (MapWindow). The MapWindow interface includes an extensible architecture that allows plug-in's to be developed and incorporated within BASINS/MapWindow to provide additional functionality. A BASINS CatchmentSIM plug-in has been developed to allow data (i.e., DEMs, watercourse, land use and soils information) that is automatically downloaded in BASINS to be exported and used to automatically setup a new CatchmentSIM project. A description of the plug-in and how to use the plug-in to setup a new CatchmentSIM project is described below.
plug-in installation
To install the BASINS plug-in, locate the "BASINS plug-in" directory on the CatchmentSIM installation CD. Within this directory locate "mwCatchmentSIMinterface.dll". This is the BASINS plugin. Copy and paste the "mwCatchmentSIMinterface.dll" file into the BASINS plugin directory (typically "C:\Basins\bin\Plugins").
Open BASINS by selecting Start 'Menu >> All Programs >> BASINS >> BASINS 4'. The main BASINS window will be displayed along with a "Welcome to BASINS 4" dialog. Close this dialog by clicking the "Close" button.
Select the "Plug-ins" menu. You should see a "CatchmentSIM Interface" menu item. Ensure that it is 'checked' by clicking on the menu item, as shown below.

Click to Enlarge Image
Once you 'check' the 'CatchmentSIM Interface' menu item a new 'CatchmentSIM' menu and toolbar will be added (refer below). The plug-in is now installed and ready to use.

Click to Enlarge Image
downloading data
To use the BASINS automated download facility, you must first setup a new project. In BASINS select 'File >> New'. A GIS map of the United States will appear in the main BASINS window along with state boundaries (maroon lines) county boundaries (de-selected by default) and hydrologic unit boundaries (turquoise lines), as shown below. You must use this map to define your study area by selecting a hydrologic unit.
As an example, we will use the Pamunkey River, which drains to Chesapeake Bay in eastern Virginia. Zoom to the area shown on the map below using the 'navigation tools'. Once you have located the Pamunkey River watershed, use the 'select tool' to select the hydrologic unit. "02020106 : Pamunkey. Virginia" should now be included in the 'Selected Features' section of the 'Build New BASINS 4 Project' dialog.

Click to Enlarge Image

Click to Enlarge Image
Click the "Build" button. A "Save New Project As" dialog will appear asking you to specify the filename and directory where the new BASINS project will be saved. Next a "Projection Properties" dialog will appear. This allows you to specify your default projection for your new BASINS project. All new data that is downloaded will be transformed to this projection so that all data layers overlay correctly. For this example, select "UTM - 1983" from the category drop down box and select "Zone 18" from the name drop down box. Once you have specified this information, the software will download, unzip and load all of the default BASINS data into the new BASINS project. Please note that you must have an active internet connection.
The new BASINS project should look similar to that shown below.

Click to Enlarge Image
Basins has downloaded a range of data and has automatically incorporated this data into the BASINS project. Not all data layers are shown by default. Data that is downloaded by default that can be used within CatchmentSIM includes a STASGO soil layer and a watercourse/stream layer.
Additional data (e.g., DEM) can also be downloaded using the Web Data Download tool. To use this tool select 'File >> Download Data'. The BASINS Web Data Download dialog will appear allowing the user to select which general data type they would like to download. To download DEM data, ensure that the top check box is selected, as shown below, and select "Next".

Click to Enlarge Image
A new dialog box will now appear, allowing the user to select a specific data product to download (refer image below).

Click to Enlarge Image
A brief description of each applicable data type available for download is provided below:
•BASINS Digital Elevation Model (DEM): USGS 300 metre DEM;
•BASINS National Elevation Dataset (NED): USGS 30 metre DEM;
•BASINS National Hydrography Dataset (NHD): Medium resolution dataset containing stream segment and lake identifiers as well as information on flow direction, names, stream level, and centerline representations for areal water bodies;
•BASINS GIRAS landuse: 1:250,000 scale land use / land cover data;
Select the 'BASINS National Elevation Dataset (NED)' check box and click the 'Next' button . The NED DEM will be downloaded, extracted and will be displayed over the existing BASINS layers. The BASINS window should look similar to the following after adjusting the order of the data layers.

Click to Enlarge Image
using catchmentsim interface
To export the DEM, watercourse and soil information from BASIN, click the  icon on the BASINS toolbar. The CatchmentSIM Interface will display as shown below.
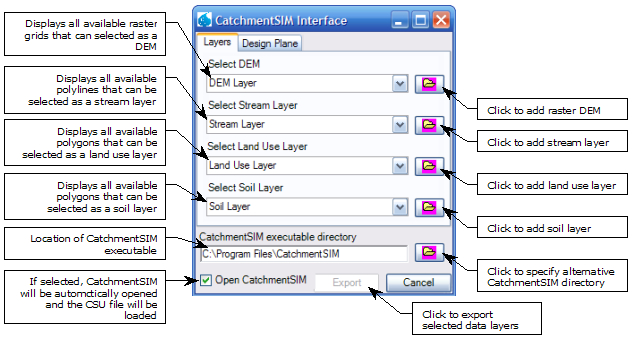
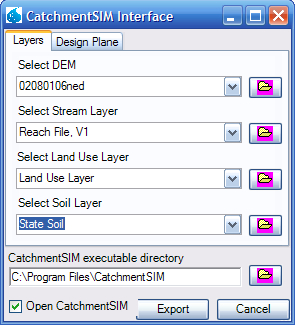
Select the DEM, stream, land use and/or soil layer that you wish to export (refer to the image below for guidance for the example application). The only data layer that is required is a DEM.
Next click the "Design Plane' tab. The design plane page will be displayed as shown below.
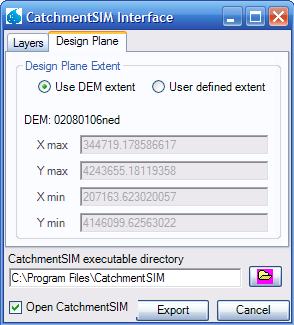
The 'Design Plane' page allows you to specify the extent of the CatchmentSIM Design Plane. Selecting the "Use DEM Extent" radio button is suitable in most circumstances.
Ensure that the CatchmentSIM executable directory is correct and that the "Open CatchmentSIM" check box is selected. Click the "Export" button. A new dialog will open asking for you to specify the name and directory where the CSU file (CatchmentSIM Setup File) will be exported and the new CatchmentSIM project will be saved (the name of the CSU file will also be reproduced as the CatchmentSIM project filename). Once you click "Save", the CSU file will be created and CatchmentSIM will be opened and the CSU file will be automatically loaded. After modifying the default vector and raster layer colours, your CatchmentSIM project should look similar to the following image. The project is now ready for hydrologic conditioning and catchment partitioning.

Click to Enlarge Image